nRF24L01을 이용해서 1:1 통신을 사용해보도록 하겠습니다.
먼저 모듈 상태를 봐야합니다.
모양이 서로 상이한 모듈을 사용했는데 진행하는데 있어서 문제는 없었습니다.
다음은 사용한 모듈입니다.
NRF24L01 RF Board (B) - Waveshare Wiki
NRF24L01 RF Board (B) - Waveshare Wiki
NRF24L01 RF Board (B) Wireless 2.4G solution for SPI interface, horizontal pinheaders Primary Attribute Category: Modules, RF {{{userDefinedInfo}}}: {{{userdefinedvalue}}} Brand: Waveshare Onboard Interfaces Introduction Wireless 2.4G solution for SPI inte
www.waveshare.com
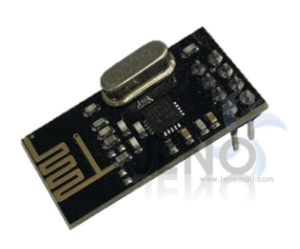
이렇게 두가지 모듈을 사용했습니다.
연결방법은 동일합니다.
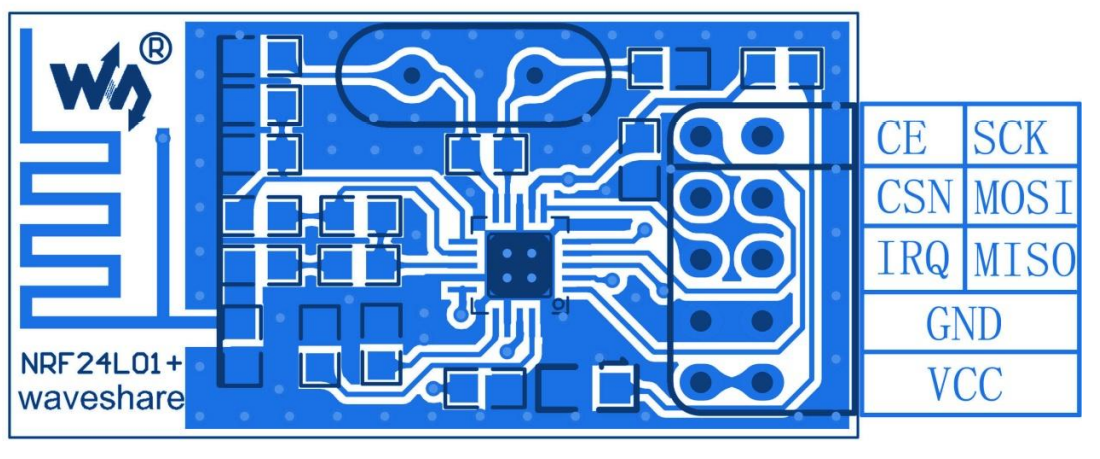
CE - 7
CSN - 8
MOSI - 11
MISO - 12
SCK - 13
IRQ - 연결 X
아두이노 Uno에 각 디지털 핀에 연결하였습니다.
nrf24L01이 SPI로 동작됨을 알수 있습니다.
아두이노로 사용함에 있어서 라이브러리가 있으므로 사용하면 되는데 저는 다음 라이브러리를 적용하였습니다.
GitHub - nRF24/RF24: OSI Layer 2 driver for nRF24L01 on Arduino & Raspberry Pi/Linux Devices
GitHub - nRF24/RF24: OSI Layer 2 driver for nRF24L01 on Arduino & Raspberry Pi/Linux Devices
OSI Layer 2 driver for nRF24L01 on Arduino & Raspberry Pi/Linux Devices - GitHub - nRF24/RF24: OSI Layer 2 driver for nRF24L01 on Arduino & Raspberry Pi/Linux Devices
github.com
마스터 예제
#include <SPI.h>
#include "RF24.h"

uint32_t pre_time = 0;
int send_msg = 0;
int recv_msg = 0;
const uint32_t pipe = 0xFF0000AA;

 RF24 radio(7,8);  // CE, CSN

void setup(void) {
    Serial.begin(9600);
    radio.begin();
    /*
    radio.setPALevel(RF24_PA_MAX);    // MIN, LOW, HIGH, MAX
    radio.setDataRate(RF24_250KBPS);
    radio.setRetries(15,15);
    radio.setCRCLength(RF24_CRC_16);
    radio.setChannel(108);
    */

    pre_time = millis();
}

void loop(void) {

    if(millis() - pre_time >= 1000)
    {
        pre_time = millis();
        nrf_send_data(pipe, send_msg++);
    }

    nrf_recv_data();
}


void nrf_send_data(uint32_t node, uint8_t data)
{
    radio.openWritingPipe(pipe);            // Open write Pipe
    radio.stopListening();                  //
    radio.write(&data, sizeof(data));
    Serial.print("Meassage (M_TX) = ");
    Serial.println(data);
    radio.openReadingPipe(1, node);         // Open read Pipe
    radio.startListening();                 // Ready to read
}


void nrf_recv_data(void)
{
    if(radio.available())
    {
        radio.read(&recv_msg, sizeof(recv_msg));
        Serial.print("Meassage (M_RX) = ");
        Serial.println(recv_msg);
    }
}
다음은 슬레이브 예제입니다.
#include <SPI.h>
#include "RF24.h"

int recv_msg = 0;
const uint32_t pipe = 0xFF0000AA;

RF24 radio(7,8);  // CE, CSN

void setup(void) {
    Serial.begin(9600);
    radio.begin();
    radio.openReadingPipe(1, pipe);
    radio.startListening();
}

void loop(void) {
    nrf_recv_data();

    if(Serial.available())
    {
        uint8_t recv = Serial.read();
        nrf_send_data(pipe, recv);
    }
}


void nrf_send_data(uint32_t node, uint8_t data)
{
    radio.openWritingPipe(node);            // Open write Pipe
    radio.stopListening();                  //
    radio.write(&data, sizeof(data));
    Serial.print("Meassage (S_TX) = ");
    Serial.println(data);
    radio.openReadingPipe(1, node);         // Open read Pipe
    radio.startListening();                 // Ready to read
}


void nrf_recv_data(void)
{
    if(radio.available())
    {
        radio.read(&recv_msg, sizeof(recv_msg));
        Serial.print("Meassage (S_RX) = ");
        Serial.println(recv_msg);
    }
}
아두이노는 라이브러리가 잘 만들어진게 많아서 쉽게 해결할 수 있습니다.
'b. 임베디드 > 아두이노' 카테고리의 다른 글
| [아두이노] 74HC4051 모듈 사용하기 (0) | 2022.05.01 |
|---|---|
| [아두이노] Byte 수대로 데이터 읽어오기 (0) | 2018.08.08 |
| [아두이노] DFPlayerMini mp3모듈 사용(2) (0) | 2018.08.02 |
| [아두이노] DFPlayerMini mp3모듈 사용(1) (0) | 2018.08.02 |
| [아두이노] HX711 로드셀을 이용한 무게측정하기 (0) | 2018.08.02 |
| [아두이노] #define _DEBUG_ 사용하기 (0) | 2018.08.02 |
| [아두이노] String문자를 int형으로 변환하기 (0) | 2018.08.02 |
| [아두이노] 소수점 표현하기 (0) | 2018.08.02 |
nRF24L01을 이용해서 1:1 통신을 사용해보도록 하겠습니다.
먼저 모듈 상태를 봐야합니다.
모양이 서로 상이한 모듈을 사용했는데 진행하는데 있어서 문제는 없었습니다.
다음은 사용한 모듈입니다.
NRF24L01 RF Board (B) - Waveshare Wiki
NRF24L01 RF Board (B) - Waveshare Wiki
NRF24L01 RF Board (B) Wireless 2.4G solution for SPI interface, horizontal pinheaders Primary Attribute Category: Modules, RF {{{userDefinedInfo}}}: {{{userdefinedvalue}}} Brand: Waveshare Onboard Interfaces Introduction Wireless 2.4G solution for SPI inte
www.waveshare.com
이렇게 두가지 모듈을 사용했습니다.
연결방법은 동일합니다.
CE - 7
CSN - 8
MOSI - 11
MISO - 12
SCK - 13
IRQ - 연결 X
아두이노 Uno에 각 디지털 핀에 연결하였습니다.
nrf24L01이 SPI로 동작됨을 알수 있습니다.
아두이노로 사용함에 있어서 라이브러리가 있으므로 사용하면 되는데 저는 다음 라이브러리를 적용하였습니다.
GitHub - nRF24/RF24: OSI Layer 2 driver for nRF24L01 on Arduino & Raspberry Pi/Linux Devices
GitHub - nRF24/RF24: OSI Layer 2 driver for nRF24L01 on Arduino & Raspberry Pi/Linux Devices
OSI Layer 2 driver for nRF24L01 on Arduino & Raspberry Pi/Linux Devices - GitHub - nRF24/RF24: OSI Layer 2 driver for nRF24L01 on Arduino & Raspberry Pi/Linux Devices
github.com
마스터 예제
#include <SPI.h>
#include "RF24.h"

uint32_t pre_time = 0;
int send_msg = 0;
int recv_msg = 0;
const uint32_t pipe = 0xFF0000AA;

 RF24 radio(7,8);  // CE, CSN

void setup(void) {
    Serial.begin(9600);
    radio.begin();
    /*
    radio.setPALevel(RF24_PA_MAX);    // MIN, LOW, HIGH, MAX
    radio.setDataRate(RF24_250KBPS);
    radio.setRetries(15,15);
    radio.setCRCLength(RF24_CRC_16);
    radio.setChannel(108);
    */

    pre_time = millis();
}

void loop(void) {

    if(millis() - pre_time >= 1000)
    {
        pre_time = millis();
        nrf_send_data(pipe, send_msg++);
    }

    nrf_recv_data();
}


void nrf_send_data(uint32_t node, uint8_t data)
{
    radio.openWritingPipe(pipe);            // Open write Pipe
    radio.stopListening();                  //
    radio.write(&data, sizeof(data));
    Serial.print("Meassage (M_TX) = ");
    Serial.println(data);
    radio.openReadingPipe(1, node);         // Open read Pipe
    radio.startListening();                 // Ready to read
}


void nrf_recv_data(void)
{
    if(radio.available())
    {
        radio.read(&recv_msg, sizeof(recv_msg));
        Serial.print("Meassage (M_RX) = ");
        Serial.println(recv_msg);
    }
}
다음은 슬레이브 예제입니다.
#include <SPI.h>
#include "RF24.h"

int recv_msg = 0;
const uint32_t pipe = 0xFF0000AA;

RF24 radio(7,8);  // CE, CSN

void setup(void) {
    Serial.begin(9600);
    radio.begin();
    radio.openReadingPipe(1, pipe);
    radio.startListening();
}

void loop(void) {
    nrf_recv_data();

    if(Serial.available())
    {
        uint8_t recv = Serial.read();
        nrf_send_data(pipe, recv);
    }
}


void nrf_send_data(uint32_t node, uint8_t data)
{
    radio.openWritingPipe(node);            // Open write Pipe
    radio.stopListening();                  //
    radio.write(&data, sizeof(data));
    Serial.print("Meassage (S_TX) = ");
    Serial.println(data);
    radio.openReadingPipe(1, node);         // Open read Pipe
    radio.startListening();                 // Ready to read
}


void nrf_recv_data(void)
{
    if(radio.available())
    {
        radio.read(&recv_msg, sizeof(recv_msg));
        Serial.print("Meassage (S_RX) = ");
        Serial.println(recv_msg);
    }
}
아두이노는 라이브러리가 잘 만들어진게 많아서 쉽게 해결할 수 있습니다.
'b. 임베디드 > 아두이노' 카테고리의 다른 글
| [아두이노] 74HC4051 모듈 사용하기 (0) | 2022.05.01 |
|---|---|
| [아두이노] Byte 수대로 데이터 읽어오기 (0) | 2018.08.08 |
| [아두이노] DFPlayerMini mp3모듈 사용(2) (0) | 2018.08.02 |
| [아두이노] DFPlayerMini mp3모듈 사용(1) (0) | 2018.08.02 |
| [아두이노] HX711 로드셀을 이용한 무게측정하기 (0) | 2018.08.02 |
| [아두이노] #define _DEBUG_ 사용하기 (0) | 2018.08.02 |
| [아두이노] String문자를 int형으로 변환하기 (0) | 2018.08.02 |
| [아두이노] 소수점 표현하기 (0) | 2018.08.02 |